Back in the Game

To say that this has been a whirlwind summer would be an understatement.

IMG_2762

In between family vacations, road trips, settling into a new routine, preparing a new classroom, and starting to actually teach a new grade in a new school….well, one could say that I’ve had little time or energy for cooking, much less blogging!

IMG_3059

However, things have begun to settle into somewhat of a routine.  Life in 2nd grade is worlds away from life as a 3rd grade teacher, but I’m finding that some aspects are quite wonderful (like the fact that we’ve spent three weeks exploring butterflies!).  I’ve started a part time job at my family’s wild game processing plant and connected with a wonderful family to occasionally babysit for.  I also got a new (to me) car!!! The best thing though, is that I’ve found a church and a few wonderful people that have welcomed me wholeheartedly into their lives!

IMG_3073

I love having a plan, a routine.  It gives me time for the things I love to do without making me stressed out.  That’s the main reason I’m excited for fall, because I’ll once again have the opportunity to work in the kitchen (with a purpose!) and blog about what I’m doing in there!   I’m back in the game folks, and I’m excited to share this beautiful season with all of you. 🙂

When Life Hands You Lemons…

…you grab some limes and make a kick-butt lemon-lime cake!!!

IMG_2979

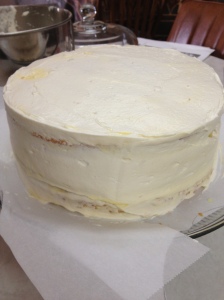
And if it happens to be your birthday, you dub this delectable concoction your birthday cake! (Plus you forget to take a picture of the beautiful 4 layers inside…oops)

I hope that you understand that no one forced me to make my own cake, no one forgot to offer to take on cake duty, no one dropped the ball.  I wanted to make my own cake.  I wanted this for 2 simple reasons: 1) I love making other people fancy cakes on their birthdays and I wanted to make a fancy cake for me and 2) I just really love baking and new recipes that much.

IMG_2973

Spending all day in the kitchen zesting and peeling and simmering and whipping and folding might seem like torture (or at least not very fun-filled) to many, many people.  However, in my personal ongoing quest for weirdness, I shiver with joy and anticipation when faced with the possibility of a day like that.

IMG_2972

Like Julie from the movie Julie and Julia, I find great comfort and solace in my kitchen.  I love the way the rest of the world just disappears when I’m sunk deep into a brand new recipe.  The contentment I find in the familiar steps and process of bringing together a well loved recipe.  There is peace to be found in stirring cookie dough with a wooden spoon.  Childlike amazement to be found every time egg whites turn from a slick, heavy puddle to fluffy, glossy peaks in the stand mixer (they seriously look like frosting! can they really just be raw egg?).

IMG_2963

I suppose I could have just said I really love baking instead of writing you an entire paragraph…oh wait! I did that too 🙂

I will be honest and tell you that making this cake exactly as the recipe says is not for the faint of heart.  After all you have to make 4 different possibly time-intensive recipes from scratch.  HOWEVER,  you can easily make just one component and use your own recipes (or even mixes!) for the rest.  The result will still be a delicious, wonderful cake.

Part One: Lemon-Lime Curd

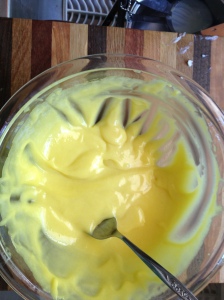
This is the filling for the cake, as in what you put between the layers.  It also is wonderful eaten on its own…don’t ask me how I know this…  After making the cake once, the only change I made was to decrease the amount used for layering the cake as it can make the cake very. very sweet (and eat the rest over plain yogurt or jsut on its own, yum).  If you choose to only make this part, I would still pair it with a basic white cake and a frosting that is not overly sweet.

IMG_2964

Lemon-Lime Curd

from chow.com

Ingredients:

  • 12 large egg yolks (if you’re making the cake below, save 6 of the whites for that recipe)
  • 1 1/2 cups sugar
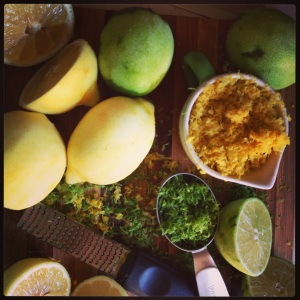
  • 1/2 cup finely grated lemon zest (about 4-5 large lemons)
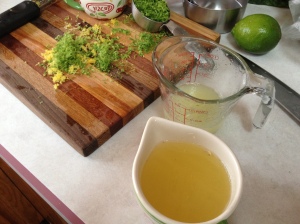
  • 2/3 cup freshly squeezed lemon juice (3-4 of those poor naked lemons from above)
  • 1/4 cup finely grated lime zest (about 3-4 large limes)
  • 1/3 cup freshly squeezed lime juice (3-4 of those poor naked limes from above)
  • 1/2 teaspoon fine salt
  • 2 1/4 sticks unsalted butter, cut into 9 pieces, softened

*Note: I would HIGHLY recommend investing in a microplane citrus zester for this recipe!  Otherwise your hand may fall off….

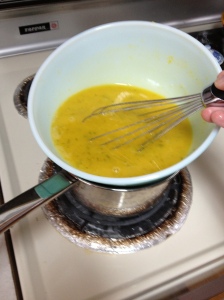
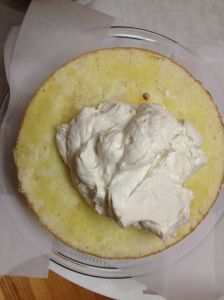
Combine everything except the butter in a heat proof bowl and whisk to combine well.  Over 2 inches of BARELY simmering water, constantly whisk the mixture until it thickens to a mayo-like consistency.  This could take anywhere from 15-30 minutes.  Check the water occasionally to make sure it is not boiling, otherwise the eggs might curdle and become gross.  After the mixture has thickened, whisk the butter pieces in one at a time until melted.  Next, strain with a fine-mesh sieve making sure to press all the curd from the pulp and scrape the bottom of the sieve.  Press a piece of plastic wrap against the surface to avoid a skin forming and refrigerate for 3-4 hours before using.  Try not to eat it all.  When you are ready to assemble the cake, use 1/2 -3/4 cup on each layer.  Refrigerate for 20-30 min after assembling before attempting to frost the cake.  I would use a thin layer of frosting (AKA: crumb coat) to seal all crumbs and extra curd and refrigerate for another 20-30 min before putting the pretty layer of frosting on.  It REALLY makes a difference!!

Part Two: Lemon-Lime Cake

IMG_2975

Oh. My. Scrumptious. This cake is elevated from basic white cake with just a touch of lemon and lime zest.  And by cutting into 4 layers, well, you just look like a really fancy baker.  While I wholeheartedly recommend layering it with curd recipe above, it would also be delicious with a store-bought curd or just a simple frosting.

Lemon-Lime Cake

from chow.com

Ingredients:

  • 2 cups cake flour (plus more for the pans)
  • 2 teaspoons baking powder
  • 1/2 teaspoon fine salt
  • 1 1/2 cups sugar
  • 1 1/2 sticks unsalted butter, softened (plus more for the pans)
  • 1 teaspoon finely grated lemon zest
  • 1 teaspoon finely grated lime zest
  • 1 teaspoon vanilla extract
  • 1/2 cup whole milk, at room temperature
  • 6 large egg whites, at room temperature

Heat oven to 350 degrees and place racks in the middle.  Butter and flour 2 round 8 inch cake pans and set aside.  Whisk or sift flour, baking powder, and salt together and set aside.  Cream 1 1/4 cups of sugar and all the butter together until very light and fluffy.  Add the lemon zest, lime zest, and vanilla and beat until combined well.  Add a 1/3 of the flour mixture and beat until combined, then add half the milk and beat again.  Repeat: flour, milk, flour and mixed until smooth.

In a clean bowl, beat the egg whites until they form medium peaks.  Add the remaining 1/4 cup sugar and beat until stiff, glossy peaks are formed.  Stand back in wonder and resist all urges to taste.  It’s not as good as it looks.

Fold 1/4 of the egg whites into the batter being careful not to break them down too much.  Add the rest of the egg whites and fold until they are completely combined and no white areas remain.  Divide the batter between the pans and bake about 3 minutes or until the cake springs back when pressed lightly and a toothpick inserted into the center comes out clean.  Cool in the pans for 5-19 minutes and invert to cool completely.  If making a 4 layer cake, cut each round in half using a long, serrated knife when they are completely cool.

*Note:  When making a layer cake, it is helpful to freeze each layer for approx. 30 minutes.  It will thaw by the time you want to serve, and it will be much easier to stack and assemble the cake.

Part Three: Frosting

IMG_2974

While poking around on Pioneer Woman one day, I found this recipe for white frosting.  It’s a weird recipe and you really do need a stand mixer to make it easily.  But it is worth it!  It tastes almost exactly like sweetened whipped cream, but won’t melt on you and I think it is easier to spread.  If it’s a little too odd for your tastes, whipped cream or a lightly sweetened frosting would take it’s place quite well.

The Best Frosting I’ve Ever Had

(Yes, I am just linking to Pioneer Woman’s Tasty Kitchen on this one because this post is already super long and I still have to give you one more recipe!)

Part Four:  Candied Lemon and Lime Peel

IMG_2971

Want to be super fancy? Make this zest.  The peeling can be a bit time consuming but the rest is a snap.  And your mouth with thank you.  And people will ooohh and ahhhh over how pretty your cake is.  And when they taste it, their mouths will thank you as well.  (FYI, this is probably the easiest part to skip if you’re a little overwhelmed.  After a cake is still beautiful with just loads of delicious frosting!)

Candied Lemon and Lime Peel

(I’m linking to an outside source again, this time Shutterbean, because of space and because she just makes her posts so beautiful!  The only two changes I would make is to use lemons and limes -obvious right?- and that for decorating a cake they don’t need to harden a full day, they just need to be completely cool.)

Sneak Peek

What’s the best way to vacation?

A road trip with your best friends!!!!

20130630-001310.jpg

I’m currently halfway through a 2 WEEK epic road trip along the West Coast, and though I would throw a few pictures your way.

(I’m planning on a longer post when I get back, so this is just a preview 🙂 )

Day 1

20130630-001548.jpg

We drove to Denver first, and on Day 2 we drove through the Rockies!!!!!!

20130630-001800.jpg

Day 3 saw us stopping at Arches National Park…

20130630-001907.jpg

We then stopped in Vegas on Day 4…(the desert got super boring!!)

20130630-002041.jpg

Finally on Day 5 we hit California!!! (Visalia to be exact 🙂 )

20130630-002216.jpg

I was super excited yesterday (Day 6 for those of you keeping track…) because we made it to San Francisco!!! I’m discovering I looooove this city 🙂 Also, our 5th member was finally able to join the group! Yay!

20130630-002343.jpg

Today was Day 7 and I saw the Pacific Ocean for the first time!!!

20130630-002509.jpg

I can’t wait to see what adventures the next week will hold!!!

For quicker updates on the EPIC ROAD TRIP (!!!), follow me on Instagram under ladyaubsbean 🙂

The Perfect Thank You

As you know, I moved a couple of weeks ago.

IMG_1959

Left my near-perfect teaching job in Bixby.

Left my wonderfully amazing, super supportive team. (We’re missing 4 people, but this is most of us!)

IMG_1886

Left Tulsa.

Left my 3rd floor apartment.

Left my *gulp* roommates that have become family. (pause to wipe away tears)

IMG_1924

Moved into my amazing Grandma’s house.

Moved mountains of materials into my new ginormous classroom.

Moved back into my family’s daily life.

Started walking regularly (in hopes that will turn to jogging!).

B8380EAE-2789-4954-ACBB-7F3E6259B188

Started the process of finding a church that will feed my soul.

Began convincing my cat that 5 am is NOT in fact the optimal time to eat breakfast. Don’t let the furry face fool you. She is a menace at 5 am.

IMG_1971

Since moving I haven’t really been doing a great deal of cooking, but I have been doing a fair bit of cookie baking!

IMG_2030

And, to be honest, cookie eating.  Yum.

I have a problem with chocolate chip cookies, mine almost always turn out super flat.  This is not necessarily a bad thing, unless you are wanting puffy cookies.   My roomies didn’t have this problem.  They can take the exact same recipe and their cookies will be puffy and perfect.

(For the next part to make much sense you need some background.  My Grandma lives right next to the wild game processing plant that my Grandpa started years and years ago.  When I say next to the shop, I mean the house shares a abnormally large driveway and paved area with it.   My aunt, uncle, cousin, and a couple of other guys work there year round with the rest of the family pitching in during deer season.)

My cousin and one of the workers were asked by my Grandma to help me unload the truck, and since she’s Grandma, you do whatever she asks willingly.  She’s just that awesome.

As a thank you, I offered to make some cookies for them.  Alas, they both requested chocolate chip.

I tried a batch, they tasted weird, were burned on the bottom and were…you guessed it, flat.

I didn’t take pictures.  They were that bad.

I tried another batch after tinkering with the oven.  They came out like normal, but were super flat and I just didn’t want to give the guys flat cookies.  Plus I was out of chocolate chips and had to use M&Ms.  That’s not what they asked for! 🙂

IMG_1988

I did an internet search.  I found a recipe that I had heard about, but never tried before.  The cookies were perfectly puffy and deliciously soft!

IMG_2032

(They also didn’t puddle out to triple their original size like my trademark flat ones!)

This recipe seems to be a classic according to the comments, so if you already know it….then you are way ahead of me in the awesome cookie realm!!  For anyone with a similar chocolate chip cookie block to mine, you’re welcome.  Enjoy the cookies 🙂

Soft Chocolate Chip Cookies

very slightly adapted from Allrecipes.com

Ingredients:

  • 2 1/4 cups flour
  • 1 teaspoon baking soda
  • 1 cup butter, softened
  • 3/4 cup packed brown sugar
  • 1/4 cup white sugar
  • 1 (3.4 oz) package instant vanilla pudding mix (what?!?! Totally the secret ingredient for the puff impaired!)
  • 2 eggs
  • 2 teaspoons vanilla extract
  • 2 cups semi-sweet chocolate chips

Preheat oven to 350.  Whisk together flour and baking soda until incorporated and set aside.  Cream butter and sugars together, but don’t go crazy here.  I just found out over-mixing and cookies don’t mix (haha).  Add the package of pudding and mix until just combined.  Beat in the eggs and vanilla, then the flour mixture.  Again, (say it with me) until just combined!  I’ve taken to stopping my mixer when there is still a little flour showing and finishing by hand to avoid this :).  Fold in the chocolate chips.  (Special note, try to use quality chocolate chips.  I’m a generic brand kind of girl myself, but I’ve found springing for the Ghirardelli/fancy chips makes a HUGE difference and its one of the few non-generic items I’ll buy.)  Scoop dough onto a baking sheet in rounded spoonfuls and bake for 9-11 minutes or until the edges start to brown slightly.  Cool just enough for the chocolate to no longer be lethal before scarfing down or cool completely and use as a perfect thank you gift.

Make approx. 3 dozen cookies

Cookies will stay soft for a long time, I made them 6 days ago and the few that remain still taste fresh and soft.

Pasta Perfection

I. Heart. Pasta.

Big time.

Recently I posted on here about a legit pasta alternative…but sometimes you just gotta have the real stuff.

IMG_1978

This pasta is so beyond perfect for summertime, and has the potential to be an incredibly quick, totally impressive dinner.

The reason it has potential to be incredibly quick is the tomatoes…

IMG_1976

They sorta need to roast for 3 hours.

BUT!  You could slice up a bunch of tomatoes when you get back from the store and forget about them until you need to remove from the oven and just save them for a recipe.  A recipe like this one!

IMG_1977

It’s important to know that I am not a tomato fan.  That means you should listen to me and take the 10 minutes to slice these babies up.  Cause they are that good.

Yup.

Anywho, after the tomatoes are roasted to “sun-dried” perfection they can be used right away or stored in olive oil in the fridge (totally found that tip on Smitten Kitchen!)

The other reason that this recipe is amazing is that it is so flexible!  Change the amount/type of pasta! Add more cheese!  More tomatoes!  Less pine nuts!  Whatever you want!

Enough talking though, lets get down to the recipe.

Caprese Pasta

Adapted slightly from The Italian Dish

Ingredients

  • 10-12 oz pasta (any type will work well, I prefer spirals or spaghetti myself)
  • Grape (or similar) tomatoes
  • 4 oz fresh mozzerella (about half a ball)
  • Handful of fresh basil
  • Olive oil
  • 1 clove garlic
  • 1/3 cup pine nuts (optional)

Make Ahead:

Slice the tomatoes in half.  Drizzle with olive oil and a pinch of salt and pepper.  Roast in a 225 degree oven for about 3 hours.  The outsides should be dry and the insides just slightly juicy.  (Do this ahead of time!!!!!!!!!)

Make garlic infused olive oil.  Finely chop 1 clove of garlic and place in a pan over med-low heat.  Add approx 1/2 cup olive oil and heat through.  Remove and let cool.  (Again, do this ahead of time to have on hand!!!!!)

Actual Recipe:

Boil pasta in salted water using package directions until al dente.  Drain.  While cooking the pasta, roll basil leaves and chop thin slices.  You should end up with fancy looking strips.  Slice the fresh mozzarella into small chunks.  Toast pine nuts in a dry pan until lightly toasted. Pull out your tomatoes and garlic olive oil.  Toss the cooked pasta with the pine nuts, tomatoes, mozzarella, basil, and 1-2 tablespoons olive oil.  Salt and pepper to taste.  This can be eaten either cold or hot, but I prefer hot as the cheese gets slightly melty.  Enjoy with a seasonal vegetable for a satisfying yet light pasta meal!

Moving…and Restarting

So…there has been a distinct lack of fresh posts on here the last few weeks.

I promise that I have a very good reason for this.

IMG_1946


Moving has somewhat taken over my life.

IMG_1947


If only to-do lists could count as blog posts…there were a lot of them!

I promise to have some new content up in a couple of days, but at the moment I have to unpack in my new place!

IMG_1960


It’ll happen 🙂

IMG_1961

Sometimes…

Sometimes…life is super busy and you can barely find time to breathe.

Occasionally…you get news of the unexpected type that turns your world around (in a good way!).

Often…you need your best friend to hold your hand and keeping you walking through the dry spells.

On occasion…you are blessed by a perfect evening on the porch surrounded by loved ones.

Weekly…you realize that it has been a boxed mac-n-cheese for supper type of day.

Rarely…you stop to considered how the bright moments outweigh the dark when your friends are there beside you.

Sometimes…you realize what’s important.

20130508-212205.jpg

Life is Messy Sometimes

Have you ever made or done something that initially was awesome, but then turned out to be completely not-awesome at all?

IMG_1787

Yeah…

Beautiful fresh veggies, savory beans, funky pasta, chicken broth…

IMG_1788

Simmered together in a soup that looked and smelled decadent…

What could go wrong?

IMG_1794

Turns out, a lot can go wrong.

I’ve made no-tomato minestrone before that was amazing and that I couldn’t stop eating.  I foolishly forgot to write down my recipe though, and last weekend I tried to recreate it.  Well…you could say it didn’t turn out as planned.

The first bowl was delicious.

IMG_1798


But then the soup decided that it didn’t need broth anymore and I believe the pasta acquiesced and soaked it all up.

The result: pure mush.

I was sad to say the least.

I learned an important lesson though through this soup.

Sometimes life is messy…and that’s ok.

The soup (or date, or email, or Facebook status, or Twitter update, or Instagram photo) doesn’t have to be perfect all the time.  Sometimes those things that look incredible at first glance end up being terrible in the long run.

Its fine to mess up sometimes.  The important thing is that you don’t let the mess stop you from trying again.  To learn from your failure and those of others.

Perfection isn’t the goal.  The journey is.

P.S.  I’ll keep trying on the soup.  🙂

In the meantime, make yourself some chocolate covered strawberries.  They rarely disappoint!


Granola Greatness

As many of you know, I am moving back to South Dakota at the end of May.

The reason I’m bringing it up is because I am currently writing this while sitting on my porch surrounded by flowering trees, a cloudless sky, and enough wind (it’s Oklahoma after all!) to make it a perfect 73 degrees in the shade.

In South Dakota….they just had an ice storm.

When I think about moving back to what feels like 9 months of winter as I sit outside in April….I want to cry.  😥

The only thing that could pull me inside on a day like this would be…fresh, homemade granola!

IMG_1743


(and maybe a beautiful roommate!)

This granola is super simple, but super impressive.  That by the way, is one of my favorite combinations.  (The other is french fries dipped in a chocolate frosty…just in case you were wondering.)

Anyway, I found this granola on a blog while searching Pinterest for granola ideas.  I had recently become  very bored with breakfast and wanted something different but still cheaper than boxed cereal (which I don’t love in the first place unless it’s 99% sugar…).

This is a vanilla chai granola…and it’s my current obsession.

IMG_1750

Sorry there’s a blur where Rebecca’s arm should be…action shot and all.

After throwing all your dry ingredients plus vanilla into a bowl, you bring the liquids to a soft boil and mix everything all together.

IMG_1749

Look at that jar of honey…mmmmmmmmmmmm.

After mixing, it’s onto a lined pan and into a 325 degree oven for 30-35 minutes with a stir halfway through!  Quick and simple, right?!

IMG_1752


Like a fool, I forgot to take a picture of the finished product….but it basically looks like this with more browning and dried cranberries added.  It’s nummy.

Vanilla Chai Granola

adapted slightly from Chik n’ Pastry

Ingredients:

  • 3 cups old fashioned oats (you can use quick oats, but the texture will be a little different)
  • 1 cup coarsely chopped raw cashews (any nut that floats your boat will work)
  • heaping 1/2 cup unsweetened coconut flakes (I had to search for flakes, but shredded would just as well)
  • 4 Tablespoons brown sugar
  • scant 1/4 teaspoon salt
  • 1 1/2 teaspoons Chai spice (use a store bought one or the recipe included below)
  • 1 vanilla bean or 2 teaspoons vanilla extract
  • 2 Tablespoons olive oil (you can sub vegetable/canola oil if you have to)
  • 2 1/2 Tablespoons honey
  • 2 1/2 Tablespoons molasses
  • 3/4 cup dried cranberries, to be added after baking (or any dried fruit that you enjoy)

Chai Spice – makes about 3 Tablespoons (if not using a store bought mix)

  • 1 Tablespoon ginger
  • 1/2 Tablespoon cinnamon
  • 1 teaspoon cardamom
  • 1 teaspoon nutmeg
  • 1 teaspoon allspice
  • 1/2 teaspoon pepper (weird, right?!)

Preheat oven to 325.  Mix all the dry ingredients plus vanilla together in a medium sized bowl.  Make sure the sugar and vanilla gets thoroughly mixed in.  Combine the wet ingredients in a small saucepan (plus vanilla pod if you used a bean, you want to get all possible flavor out right? just discard the pod before baking…), and bring to a soft boil.  Remove and pour over the dry ingredients and mix very well.  You want everything to be well coated.  Bake for 30-35 minutes, making sure to stir halfway through so that everything gets evenly toasted.  After baking, add the dried fruit and try not to eat the entire pan as it cools.  Store at room temperature in an airtight container.  It is great on its own, with milk, or with yogurt.

Spaghetti…Squash?

IMG_1722

All who love spaghetti feasts raise their hands.

*Me Me Me Me Me!!!!*  (And Hannah loves it too because she is smiling so pretty!)

Honestly, I think I could eat spaghetti every day and not get sick of it.

IMG_1721

(Rebecca is ducking down in her chair by the way so she can’t be seen.)

Garlic bread, meat sauce, SPAGHETTI…I love it all.  Especially the family-style-ness of eating spaghetti together.

Sadly, my waistline doesn’t agree with my pasta-lovin’-soul.

Tear.

Fear not though!  My obsessive Pinterest stalking of food has finally paid off in gold!

That is, gold colored spaghetti squash!

IMG_1583

Yup.  It’s a vegetable.  That looks like spaghetti.

Want a closer look?

IMG_1584


It’s kinda weird when you think about it…which is why I choose not to.

Now, the thing is that spaghetti squash will fool no one into thinking that it is, in fact, spaghetti.  It doesn’t have a strong flavor of it’s own and has a slightly semi-crunchy texture.  It can however be a great way to have a spaghetti-style feast with way less guilt!

Since it only has about 10 carbs per serving (versus real spaghetti’s 20 million), I think that gives one a complete and total right to indulge in about…300 more slices of garlic bread.

Awesome math right?

Moving on….

IMG_1734


It’s sooooooo easy!

Spaghetti style squash!!

Makes 6 servings (half squash each)

Ingredients:

  • Spaghetti squash (I had enough sauce for 3 medium sized squashes.)
  • Meat Sauce (or regular, whatever floats your boat!)
  1. Preheat your oven to 375.
  2. Whack a spaghetti squash in half and remove the seeds (blech).
  3. Place face down on a baking sheet and roast for 45-60 min.  (They are done when you can easily rake a fork across the flesh and get strands.)
  4. While they are roasting, make a quick meat sauce.  I like to brown a lb of ground beef and add just over half a 24oz jar of Prego.  Yum.
  5. Fill the middle of the squash with sauce, sprinkle with cheese, and bake for a couple more minutes while the cheese gets melty.
  6. To eat, simple rake with a fork and mix with the sauce!

Pop quiz time!  What’s the best thing about this squash?

IMG_1717


That’s right! The ability to eat more cheesy garlic bread! 🙂

Garlic Bread

Serves…as many as you want…depends on how many pieces you deem as a serving…

Ingredients:

  • French bread (I usually use the Walmart bakery loaves)
  • Butter
  • Garlic powder
  • Salt
  • Cheese
  • Herbs (my fave is basil and marjoram)
  1. Preheat oven to 350.
  2. Slice bread to desired thickness, butter, and place on the pan.
  3. Generously sprinkle with garlic powder.   Definition: Generous – bread will be the weird yellow-y color and you probably won’t see the butter anymore…
  4. Sprinkle with a tiny bit of salt.  I get a pinch of it and lightly sprinkle over several slices.
  5. Top with cheese and herbs of choice.
  6. Bake for 10-15 min or until desired meltiness/toastiness is reached
  7. Overindulge as you had spaghetti squash instead of real spaghetti!